
Android的编程 – 帖子 5: 接口设计LinearLayoout
正如我前面所说的交, 的LinearLayout是ViewGroup中包含其他视图和水平或垂直管理 (这取决于它是明). 像这样,我们排着队, 布置在水平或垂直. 因此,当我们使用的LinearLayout很容易操作的界面. 现在,我们去实践与能力应用的一些界面设计的LinearLayout.
[qads]
1. 登录界面设计的LinearLayout
此接口是一天,我们坐在前 与RelativeLayout的设计 简单地, 现在尝试应用到的LinearLayout眼冒金星.
我们回顾如下界面:

这样, 我们在脑海中想象到,这种接口包括元素从上到下排列. 你看下面的代码:
<?xml version="1.0" encoding="utf-8"?>
<LinearLayout xmlns:android="http://schemas.android.com/apk/res/android"
    android:layout_width="match_parent"
    android:layout_height="match_parent"
    android:orientation="vertical">

    <TextView
        android:id="@+id/tvLogin"
        android:layout_width="wrap_content"
        android:layout_height="wrap_content"
        android:layout_gravity="center"
        android:text="Login"
        android:textSize="24sp" />

    <TextView
        android:id="@+id/tvUser"
        android:layout_width="wrap_content"
        android:layout_height="wrap_content"
        android:text="user" />

    <EditText
        android:id="@+id/editUser"
        android:layout_width="match_parent"
        android:layout_height="wrap_content" />

    <TextView
        android:id="@+id/tvPassword"
        android:layout_width="wrap_content"
        android:layout_height="wrap_content"
        android:text="password" />

    <EditText
        android:id="@+id/editPassword"
        android:layout_width="match_parent"
        android:layout_height="wrap_content" />

    <Button
        android:id="@+id/btnOk"
        android:layout_width="wrap_content"
        android:layout_height="wrap_content"
        android:layout_gravity="center"
        android:text="ok" />

</LinearLayout>
与此代码你将有类似的前一天,并类似于上面所描述的一个接口.

你有没有注意到以下一些属性在上面的代码:
首先的LinearLayout卡
机器人:方向=”垂直” : 与LinearLayout中, 它管理的界面垂直和水平. 关键属性 方向 在这本法规维元素. 垂直将沿着 和 将卧式.
其次是标签和标签TextView的登录按钮
机器人:layout_gravity =”中央”: 此属性是负责使所有对象布局 (TextView的登录VA按钮) 居中. 这是帧的所有部分为中心不仅文字内容 它为中心. 你还记得那天,我们有一个类似的属性 机器人:重力, 它对准对象的内容中的中间.
所以,你能想到的从我们的接口不同的方法. 它是对的LinearLayout含量之间内的卡. 所以我们并不需要对齐的TextView和按钮Login好得多,只是他们的水平方向足够的内容正在. 雕刻出来他们之间,因为它们里面是的LinearLayout原创内容的LinearLayout, 但它在中的LinearLayout内容. 但是TextView的TextView的用户和密码需要调整水平国歌鼓起屏幕,否则我们会去的. 这样的代码是这样的:
<?xml version="1.0" encoding="utf-8"?>
<LinearLayout xmlns:android="http://schemas.android.com/apk/res/android"
    android:layout_width="match_parent"
    android:layout_height="match_parent"
    android:gravity="center"
    android:orientation="vertical">

    <TextView
        android:id="@+id/tvLogin"
        android:layout_width="wrap_content"
        android:layout_height="wrap_content"
        android:text="Login"
        android:textSize="24sp" />

    <TextView
        android:id="@+id/tvUser"
        android:layout_width="match_parent"
        android:layout_height="wrap_content"
        android:text="user" />

    <EditText
        android:id="@+id/editUser"
        android:layout_width="match_parent"
        android:layout_height="wrap_content" />

    <TextView
        android:id="@+id/tvPassword"
        android:layout_width="match_parent"
        android:layout_height="wrap_content"
        android:text="password" />

    <EditText
        android:id="@+id/editPassword"
        android:layout_width="match_parent"
        android:layout_height="wrap_content" />

    <Button
        android:id="@+id/btnOk"
        android:layout_width="wrap_content"
        android:layout_height="wrap_content"
        android:text="ok" />

</LinearLayout>
在这里,你会发现我们的接口,包括元素根据需要为中心. 只有一件事是每个元素在中间垂直,如下图所示:

这是因为物业 机器人:重力=”中央” 负责的LinearLayout的内容根据最新的中间做水平和垂直方向 (中央). 为了克服这一特质, 你改变了价值中心 CENTER_HORIZONTAL 水平中心, 因为我们不希望中间垂直. 其他文章,你可能想使用垂直中心,利用价值 center_vertical.
2. 接口设计计算器 (计算器) 通过的LinearLayout
我们会尽量袖珍计算机公共职能, 减, 按, 基本划分NHE. 你做的很好要注意它的接口, 因为毕竟他会做一个练习来完成处理该计算机作为真理总是.
现在,让我们右键点击该文件夹 /RES / layoout - >新建 - >布局资源文件 - >Đặt10个文件Làlayout_calculator.xml - >确定 并打开它.
如下我们可以想象这台电脑的功能和基本形状:

这样, 我们计划使用和布局的布局如下:

从此, 我们将下面的代码:
<?xml version="1.0" encoding="utf-8"?>
<LinearLayout xmlns:android="http://schemas.android.com/apk/res/android"
    android:layout_width="match_parent"
    android:layout_height="match_parent"
    android:orientation="vertical">

    <LinearLayout
        android:layout_width="match_parent"
        android:layout_height="wrap_content"
        android:orientation="vertical"
        android:padding="8dp">

        <TextView
            android:id="@+id/tvMath"
            android:layout_width="match_parent"
            android:layout_height="wrap_content"
            android:gravity="right|center_vertical"
            android:minHeight="48dp"
            android:text="0"
            android:textSize="24sp" />

        <TextView
            android:id="@+id/tvResult"
            android:layout_width="match_parent"
            android:layout_height="wrap_content"
            android:gravity="right|center_vertical"
            android:minHeight="48dp"
            android:text="0"
            android:textSize="24sp" />

    </LinearLayout>

    <LinearLayout
        android:layout_width="match_parent"
        android:layout_height="wrap_content"
        android:orientation="horizontal">

        <Button
            android:id="@+id/btnC"
            android:layout_width="wrap_content"
            android:layout_height="match_parent"
            android:text="C"
            android:textSize="20sp" />

        <Button
            android:id="@+id/btnOpen"
            android:layout_width="wrap_content"
            android:layout_height="match_parent"
            android:text="("
            android:textSize="20sp" />

        <Button
            android:id="@+id/btnClose"
            android:layout_width="wrap_content"
            android:layout_height="match_parent"
            android:text=")"
            android:textSize="20sp" />

        <Button
            android:id="@+id/btnDiv"
            android:layout_width="wrap_content"
            android:layout_height="match_parent"
            android:text="/"
            android:textSize="20sp" />
    </LinearLayout>

    <LinearLayout
        android:layout_width="match_parent"
        android:layout_height="wrap_content"
        android:orientation="horizontal">

        <Button
            android:id="@+id/btn7"
            android:layout_width="wrap_content"
            android:layout_height="match_parent"
            android:text="7"
            android:textSize="20sp" />

        <Button
            android:id="@+id/btn8"
            android:layout_width="wrap_content"
            android:layout_height="match_parent"
            android:text="8"
            android:textSize="20sp" />

        <Button
            android:id="@+id/btn9"
            android:layout_width="wrap_content"
            android:layout_height="match_parent"
            android:text="9"
            android:textSize="20sp" />

        <Button
            android:id="@+id/btnMul"
            android:layout_width="wrap_content"
            android:layout_height="match_parent"
            android:text="*"
            android:textSize="20sp" />
    </LinearLayout>

    <LinearLayout
        android:layout_width="match_parent"
        android:layout_height="wrap_content"
        android:orientation="horizontal">

        <Button
            android:id="@+id/btn4"
            android:layout_width="wrap_content"
            android:layout_height="match_parent"
            android:text="4"
            android:textSize="20sp" />

        <Button
            android:id="@+id/btn5"
            android:layout_width="wrap_content"
            android:layout_height="match_parent"
            android:text="5"
            android:textSize="20sp" />

        <Button
            android:id="@+id/btn6"
            android:layout_width="wrap_content"
            android:layout_height="match_parent"
            android:text="6"
            android:textSize="20sp" />

        <Button
            android:id="@+id/btnSub"
            android:layout_width="wrap_content"
            android:layout_height="match_parent"
            android:text="-"
            android:textSize="20sp" />
    </LinearLayout>

    <LinearLayout
        android:layout_width="match_parent"
        android:layout_height="wrap_content"
        android:orientation="horizontal">

        <Button
            android:id="@+id/btn1"
            android:layout_width="wrap_content"
            android:layout_height="match_parent"
            android:text="1"
            android:textSize="20sp" />

        <Button
            android:id="@+id/btn2"
            android:layout_width="wrap_content"
            android:layout_height="match_parent"
            android:text="2"
            android:textSize="20sp" />

        <Button
            android:id="@+id/btn3"
            android:layout_width="wrap_content"
            android:layout_height="match_parent"
            android:text="3"
            android:textSize="20sp" />

        <Button
            android:id="@+id/btnPlus"
            android:layout_width="wrap_content"
            android:layout_height="match_parent"
            android:text="+"
            android:textSize="20sp" />
    </LinearLayout>

    <LinearLayout
        android:layout_width="match_parent"
        android:layout_height="wrap_content"
        android:orientation="horizontal">

        <Button
            android:id="@+id/btn0"
            android:layout_width="wrap_content"
            android:layout_height="match_parent"
            android:text="0"
            android:textSize="20sp" />

        <Button
            android:id="@+id/btnDot"
            android:layout_width="wrap_content"
            android:layout_height="match_parent"
            android:text="."
            android:textSize="20sp" />

        <Button
            android:id="@+id/btnResult"
            android:layout_width="wrap_content"
            android:layout_height="match_parent"
            android:text="="
            android:textSize="20sp" />

    </LinearLayout>

</LinearLayout>
从那里,我们主要有以下几个框架

你有没有注意到我们的代码很长,但是绝对是一样的基本按钮, 所以你做 1 按钮,复制行 5 客户会很快.
可视化界面来预览你会看到它是我们的愿望, 即使屏幕水平方向观看,你会发现界面如下:

因此,我们需要找到办法如何克服:
– 按钮隔开并且大小相等且水平填充屏幕, 桢按钮结果 (登录) 将占据相等的区域 2 次普通按钮.
– 均匀间隔的行,垂直填充屏幕.
要实现的按钮 1 同等大小的行和水平,以填补我们使用属性屏幕 机器人:layout_weight. 权重加权平均. 也就是说,我们基于加权设计元素 – 尺寸比. 按钮具有相同的大小和水平溢出关闭, 我们给他们相等的权重. 例如与第一线,我们将有下面的代码:
<LinearLayout
        android:layout_width="match_parent"
        android:layout_height="wrap_content"
        android:orientation="horizontal">

        <Button
            android:id="@+id/btnC"
            android:layout_width="wrap_content"
            android:layout_height="match_parent"
            android:layout_weight="1"
            android:text="C"
            android:textSize="20sp" />

        <Button
            android:id="@+id/btnOpen"
            android:layout_width="wrap_content"
            android:layout_height="match_parent"
            android:layout_weight="1"
            android:text="("
            android:textSize="20sp" />

        <Button
            android:id="@+id/btnClose"
            android:layout_width="wrap_content"
            android:layout_height="match_parent"
            android:layout_weight="1"
            android:text=")"
            android:textSize="20sp" />

        <Button
            android:id="@+id/btnDiv"
            android:layout_width="wrap_content"
            android:layout_height="match_parent"
            android:layout_weight="1"
            android:text="/"
            android:textSize="20sp" />
    </LinearLayout>
由于按钮的LinearLayout父亲是水平, 应财产 机器人:layout_weight 将被水平地施加. 在垂直的LinearLayout的情况下, 此属性适用于垂直元件.
而我们这样的界面,虽然你有模式,垂直或水平旋转屏幕太, 依然美丽.

然而,在许多情况下,, 当你给他们平等的权重, 但在漫长的按钮上的文字,他们将有不同的大小, 你可以尝试编辑按钮的文本打开一个括号长这样.

它是由性质引起的 机器人:layout_width 值得 WRAP_CONTENT 它最后只需要足够的内容.
为了克服它完全平等, 你对按钮的尺寸水平 0DP. 在这里,你看到的是规模水平由0dp因为我们的父辈布局水平, 如果父亲是垂直布局,我们必须0dp使元素的垂直尺寸.
第一排的如此完整的代码如下:
<LinearLayout
        android:layout_width="match_parent"
        android:layout_height="wrap_content"
        android:orientation="horizontal">

        <Button
            android:id="@+id/btnC"
            android:layout_width="0dp"
            android:layout_height="match_parent"
            android:layout_weight="1"
            android:text="C"
            android:textSize="20sp" />

        <Button
            android:id="@+id/btnOpen"
            android:layout_width="0dp"
            android:layout_height="match_parent"
            android:layout_weight="1"
            android:text="("
            android:textSize="20sp" />

        <Button
            android:id="@+id/btnClose"
            android:layout_width="0dp"
            android:layout_height="match_parent"
            android:layout_weight="1"
            android:text=")"
            android:textSize="20sp" />

        <Button
            android:id="@+id/btnDiv"
            android:layout_width="0dp"
            android:layout_height="match_parent"
            android:layout_weight="1"
            android:text="/"
            android:textSize="20sp" />
    </LinearLayout>
下一行,我们做同样的. 另一件事是,通过按钮, 我们需要给它的大小折叠 2 其他时间按钮, 因此,我会把它的重量 2. 我们在这里的新界面:

接下来我们要做的,使各行的高度相等,且所有的屏幕填充. 类似的想法来到了. 我们把重量为该行, 即集 机器人:layout_weight为的LinearLayout 在等于线. 但要注意, 含有这些布局的父亲是沿道路, 因此,我们必须把 机器人:layout_height =”0DP”.
最后,如下我们的界面将标准化:

用下面的代码:
<?xml version="1.0" encoding="utf-8"?>
<LinearLayout xmlns:android="http://schemas.android.com/apk/res/android"
    android:layout_width="match_parent"
    android:layout_height="match_parent"
    android:orientation="vertical">

    <LinearLayout
        android:layout_width="match_parent"
        android:layout_height="wrap_content"
        android:orientation="vertical"
        android:padding="8dp">

        <TextView
            android:id="@+id/tvMath"
            android:layout_width="match_parent"
            android:layout_height="wrap_content"
            android:gravity="right|center_vertical"
            android:minHeight="48dp"
            android:text="0"
            android:textSize="24sp" />

        <TextView
            android:id="@+id/tvResult"
            android:layout_width="match_parent"
            android:layout_height="wrap_content"
            android:gravity="right|center_vertical"
            android:minHeight="48dp"
            android:text="0"
            android:textSize="24sp" />

    </LinearLayout>

    <LinearLayout
        android:layout_width="match_parent"
        android:layout_height="0dp"
        android:layout_weight="1"
        android:orientation="horizontal">

        <Button
            android:id="@+id/btnC"
            android:layout_width="0dp"
            android:layout_height="match_parent"
            android:layout_weight="1"
            android:text="C"
            android:textSize="20sp" />

        <Button
            android:id="@+id/btnOpen"
            android:layout_width="0dp"
            android:layout_height="match_parent"
            android:layout_weight="1"
            android:text="("
            android:textSize="20sp" />

        <Button
            android:id="@+id/btnClose"
            android:layout_width="0dp"
            android:layout_height="match_parent"
            android:layout_weight="1"
            android:text=")"
            android:textSize="20sp" />

        <Button
            android:id="@+id/btnDiv"
            android:layout_width="0dp"
            android:layout_height="match_parent"
            android:layout_weight="1"
            android:text="/"
            android:textSize="20sp" />
    </LinearLayout>

    <LinearLayout
        android:layout_width="match_parent"
        android:layout_height="0dp"
        android:layout_weight="1"
        android:orientation="horizontal">

        <Button
            android:id="@+id/btn7"
            android:layout_width="0dp"
            android:layout_height="match_parent"
            android:layout_weight="1"
            android:text="7"
            android:textSize="20sp" />

        <Button
            android:id="@+id/btn8"
            android:layout_width="0dp"
            android:layout_height="match_parent"
            android:layout_weight="1"
            android:text="8"
            android:textSize="20sp" />

        <Button
            android:id="@+id/btn9"
            android:layout_width="0dp"
            android:layout_height="match_parent"
            android:layout_weight="1"
            android:text="9"
            android:textSize="20sp" />

        <Button
            android:id="@+id/btnMul"
            android:layout_width="0dp"
            android:layout_height="match_parent"
            android:layout_weight="1"
            android:text="*"
            android:textSize="20sp" />
    </LinearLayout>

    <LinearLayout
        android:layout_width="match_parent"
        android:layout_height="0dp"
        android:layout_weight="1"
        android:orientation="horizontal">

        <Button
            android:id="@+id/btn4"
            android:layout_width="0dp"
            android:layout_height="match_parent"
            android:layout_weight="1"
            android:text="4"
            android:textSize="20sp" />

        <Button
            android:id="@+id/btn5"
            android:layout_width="0dp"
            android:layout_height="match_parent"
            android:layout_weight="1"
            android:text="5"
            android:textSize="20sp" />

        <Button
            android:id="@+id/btn6"
            android:layout_width="0dp"
            android:layout_height="match_parent"
            android:layout_weight="1"
            android:text="6"
            android:textSize="20sp" />

        <Button
            android:id="@+id/btnSub"
            android:layout_width="0dp"
            android:layout_height="match_parent"
            android:layout_weight="1"
            android:text="-"
            android:textSize="20sp" />
    </LinearLayout>

    <LinearLayout
        android:layout_width="match_parent"
        android:layout_height="0dp"
        android:layout_weight="1"
        android:orientation="horizontal">

        <Button
            android:id="@+id/btn1"
            android:layout_width="0dp"
            android:layout_height="match_parent"
            android:layout_weight="1"
            android:text="1"
            android:textSize="20sp" />

        <Button
            android:id="@+id/btn2"
            android:layout_width="0dp"
            android:layout_height="match_parent"
            android:layout_weight="1"
            android:text="2"
            android:textSize="20sp" />

        <Button
            android:id="@+id/btn3"
            android:layout_width="0dp"
            android:layout_height="match_parent"
            android:layout_weight="1"
            android:text="3"
            android:textSize="20sp" />

        <Button
            android:id="@+id/btnPlus"
            android:layout_width="0dp"
            android:layout_height="match_parent"
            android:layout_weight="1"
            android:text="+"
            android:textSize="20sp" />
    </LinearLayout>

    <LinearLayout
        android:layout_width="match_parent"
        android:layout_height="0dp"
        android:layout_weight="1"
        android:orientation="horizontal">

        <Button
            android:id="@+id/btn0"
            android:layout_width="0dp"
            android:layout_height="match_parent"
            android:layout_weight="1"
            android:text="0"
            android:textSize="20sp" />

        <Button
            android:id="@+id/btnDot"
            android:layout_width="0dp"
            android:layout_height="match_parent"
            android:layout_weight="1"
            android:text="."
            android:textSize="20sp" />

        <Button
            android:id="@+id/btnResult"
            android:layout_width="0dp"
            android:layout_height="match_parent"
            android:layout_weight="2"
            android:text="="
            android:textSize="20sp" />
    </LinearLayout>

</LinearLayout>
这篇文章是在这里比较长和, 不过,我还是想引导尝试设计接口与LinearLayout中聊天. 自从他提前将驻留天不能用的LinearLayout,但最后完成, 通过脸上的份额, 我知道这是一个相当不错的把戏.
3. 聊天界面设计通过的LinearLayout
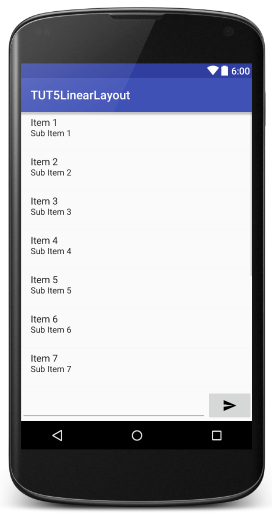
正如所有的RelativeLayout前一天聊天界面设计, 我们可视化界面.

创建新的布局文件就像创建离线计算器布局文件.
这样, 基本上我们可以安排如下安排:

在这, 我们也必须使用属性 重量 划分不知道到底的屏幕类型大小如何的接口速率.
– ListView中占据 9 部分高度
– LayoutInput会计 1 部分高度
– 在会计的EditText LayoutInput 4 部分, 按钮发送计费 1 部分.
<?xml version="1.0" encoding="utf-8"?>
<LinearLayout xmlns:android="http://schemas.android.com/apk/res/android"
    android:layout_width="match_parent"
    android:layout_height="match_parent"
    android:orientation="vertical">

    <ListView
        android:id="@+id/lvChat"
        android:layout_width="match_parent"
        android:layout_height="0dp"
        android:layout_weight="9" />

    <LinearLayout
        android:layout_width="match_parent"
        android:layout_height="0dp"
        android:layout_weight="1"
        android:orientation="horizontal">

        <EditText
            android:id="@+id/editChat"
            android:layout_width="0dp"
            android:layout_height="match_parent"
            android:layout_weight="4" />

        <ImageButton
            android:id="@+id/btnSend"
            android:layout_width="0dp"
            android:layout_height="match_parent"
            android:layout_weight="1"
            android:src="@drawable/ic_send" />
    </LinearLayout>
</LinearLayout>
看起来非常漂亮,并准备为我们的愿望, 但是如果你旋转屏幕的水平,你将看到以下:

正如你所看到的, LayoutInput部分将收缩宝宝, 因为当旋转, 降低高度,它只占 1 部分应该是小而失去焦点, 丢失的信件. 发送按钮生产商也横向凸出.
为了弥补, 我们没有把砝码放在WRAP_CONTENT LayoutInput只适合身高, 发送按钮的宽度,不仅使WRAP_CONTENT单独加权. 而因为对象发送按钮, LayoutInput加权, 如果ListView和EditText上你可以到任何特定的重量, 我喜欢 1.
<?xml version="1.0" encoding="utf-8"?>
<LinearLayout xmlns:android="http://schemas.android.com/apk/res/android"
    android:layout_width="match_parent"
    android:layout_height="match_parent"
    android:orientation="vertical">

    <ListView
        android:id="@+id/lvChat"
        android:layout_width="match_parent"
        android:layout_height="0dp"
        android:layout_weight="1" />

    <LinearLayout
        android:layout_width="match_parent"
        android:layout_height="wrap_content"
        android:orientation="horizontal">

        <EditText
            android:id="@+id/editChat"
            android:layout_width="0dp"
            android:layout_height="match_parent"
            android:layout_weight="1" />

        <ImageButton
            android:id="@+id/btnSend"
            android:layout_width="wrap_content"
            android:layout_height="match_parent"
            android:src="@drawable/ic_send" />
    </LinearLayout>
</LinearLayout>
你会看到无论是在屏幕的界面, 大或小, 水平或垂直,它不会被打破作为更. 非常好吃桃枝. ^^.
如果您有任何意见或评论, 问题, 请你在下面评论NHE.


他的大文章, 很容易理解,适合初学者, 我只希望这个系列Truy.
谢谢, 祝愿他健康.
谢谢. 与朋友分享NHE.
亲爱的朋友们, 在所有 4 和 5 这项, 当你的代码完成后,该文件MainActivity.java变化的setContentView(R.layout.activity_main); 成的setContentView(R.layout.layout_calculator); 那么整个地图错误致命异常: 主….. 运行该应用程序错误BI停止. 为了解决这个问题,呵呵如何?
不知道你没有创建正确的接口文件?